Novel Writing Software
Cosmicore LLC
Novelisha
user guide & feature reference
Version 1.4.0 • Cosmicore LLC • 2026
Professional novel writing software. Plan your book, write scene by scene, track your word count, and export publication-ready files — all in one beautiful app.
1. Welcome to Novelisha
Novelisha is a professional novel writing application designed for authors who want to plan, write, and export their books with precision and style.
What Novelisha Does
📖 Book Planning
Set up your book with target word counts, chapter structure, and scene breakdowns. Novelisha calculates everything for you.
✍ Scene-by-Scene Writing
Write one scene at a time in a clean, distraction-free editor with live word counts and progress tracking.
📊 Word Count Tracking
Track words per scene, per chapter, and per book. Visual progress bars show exactly where you are vs. your targets.
📄 Publication Export
Export as DOCX (formatted for import into layout tools), PDF (print-ready for KDP & IngramSpark), or EPUB (for all eBook stores).
🌸 Cosmicore Design
7 beautiful themes powered by the Cosmicore Jelly Glass design system. Glossy, modern, and a joy to use.
💾 Auto-Save
Your work saves automatically every 30 seconds and whenever you switch away from the app. Never lose a word.
No Internet Required
Novelisha works 100% offline. All fonts are embedded locally. Your data never leaves your computer. No accounts, no cloud, no tracking.
2. Installation
Windows
- Portable: Download
Novelisha-1.4.0-Portable.exe. Double-click to run. No installation needed — you can keep it on a USB drive or anywhere on your computer. - Installer: Download and run the installer. It will install Novelisha to your Programs folder and create a desktop shortcut.
Mac
- Download the
.dmgfile. Open it and drag Novelisha to your Applications folder.
Linux
- Download the
.AppImagefile. Make it executable (chmod +x Novelisha*.AppImage) and double-click to run.
Tip: Novelisha stores your books in your Documents/Novelisha/books/ folder. This folder is created automatically the first time you run the app.
3. Getting Started
- Launch Novelisha. You’ll see the welcome screen with the Novelisha logo and a “Create Your First Book” button.
- Click “Create Your First Book” (or press Ctrl+N). The Book Setup Wizard opens.
- Fill in your book details: title, author name, genre, target word count, number of chapters, and scenes per chapter.
- Click “Create Book.” Novelisha generates your full chapter and scene structure automatically.
- Click any scene in the left sidebar to start writing.
Your book structure is flexible. You can add, rename, reorder, or delete chapters and scenes at any time by right-clicking them in the sidebar.
4. Sidebar & Navigation
The left sidebar shows your book tree — a hierarchical view of all your books, chapters, and scenes.
Book Level
- Click a book to expand it and see its chapters.
- Right-click a book to rename it, edit its setup, add a chapter, add a prologue, add an epilogue, add a part, or delete it.
Chapter Level
- Click a chapter to expand it and see its scenes. Each chapter shows its current word count.
- Right-click a chapter to rename it, add a scene, or delete it (and all its scenes).
Scene Level
- Click a scene to open it in the Write tab. Each scene shows its current word count.
- Right-click a scene to rename or delete it.
Front Matter & Back Matter Pages
If you selected front matter or back matter pages in the Book Setup Wizard, they appear in the sidebar directly above and below your chapters. Click any page (e.g., “Dedication”, “About the Author”) to open it in the Write tab and add your content. This content is saved with your book and included in all exports.
Sidebar Controls
- Always Visible: The sidebar stays open at all times. It is hidden only in Distraction-Free Mode.
- Resize Sidebar: Drag the edge between the sidebar and main area to resize it.
- New Book: Click the + button at the top of the sidebar.
- Import / Export: At the bottom of the sidebar, two buttons let you Import a
.novelishaproject file or Export the current book as a portable.novelishafile. These are always visible for quick access.
Prologue & Epilogue
Novelisha treats the Prologue and Epilogue as narrative chapters (not front/back matter). This matches the publishing industry standard:
- Prologue — A chapter inserted before Chapter 1. It is part of the body text and starts Arabic page numbering (page 1) in PDF exports. It appears in the Table of Contents.
- Epilogue — A chapter inserted after the final chapter but before back matter (About the Author, etc.). It continues Arabic page numbering and appears in the Table of Contents.
Adding via the Book Setup Wizard
In the Book Setup Wizard, the Prologue & Epilogue section provides checkboxes:
- Check Include Prologue to automatically create a Prologue chapter before Chapter 1.
- Check Include Epilogue to automatically create an Epilogue chapter after the last chapter.
You can also toggle these on later by clicking “Edit Setup” on an existing book — a new Prologue or Epilogue chapter will be added automatically if one doesn’t already exist.
Adding via Right-Click
Right-click your book in the sidebar and choose § Add Prologue or § Add Epilogue to add them at any time.
Both are regular chapters that you can rename, reorder, add scenes to, and write in just like any other chapter.
5. Book Setup Wizard
The wizard opens when you create a new book or click “Edit Setup” on an existing book. It lets you configure everything about your book’s structure and metadata.
Book Details
- Title — Your book’s title (required)
- Author — Your name or pen name (required)
- Genre — e.g., Fantasy, Romance, Thriller
- Series Name & Number — If this book is part of a series
- ISBN — Optional. Used on the copyright page when exporting.
Word Count & Structure Calculator
This is the heart of the wizard. Set three values and Novelisha calculates the rest:
- Target Words — Your total book word count goal (default: 80,000)
- Chapters — Number of chapters (default: 27)
- Scenes per Chapter — How many scenes in each chapter (default: 3)
The calculator instantly shows:
- Words per Chapter — Auto-calculated from total / chapters
- Words per Scene — Auto-calculated from words per chapter / scenes
- Total Scenes — Chapters × scenes per chapter
- Estimated Pages — Based on ~250 words per page
Tip: The default of 80,000 words / 27 chapters / 3 scenes per chapter gives you approximately 988 words per scene — perfect for punchy, well-paced fiction.
Print & Publishing
- Trim Size: 6″ × 9″ (standard) or 5.5″ × 8.5″
- Paper Color: White or Cream
- Chapter Start Side: Right page (recto, industry standard) or Either side (saves pages)
- Running Header — Left (verso): Custom text or defaults to author name
- Running Header — Right (recto): Custom text or defaults to current chapter title
- Sub-ornament: Optional decorative divider beneath chapter titles (uses your scene break image if set)
Prologue & Epilogue
Check Include Prologue and/or Include Epilogue to add narrative chapters before Chapter 1 / after the final chapter. See Section 4 for full details.
Front Matter
Select which pages to include before Chapter 1. Each page has a dropdown: All (included in every export), eBook Only, Print Only, or None (excluded):
- Half Title, Title Page, Copyright, Dedication, Epigraph, Acknowledgements
Back Matter
Select which pages to include after your final chapter (same All / eBook Only / Print Only / None dropdown):
- About the Author, Also By, Acknowledgements, Sneak Peek, Glossary
Custom Design
Import custom artwork and choose fonts for your exports. See Sections 13 and 18 for full details.
- Scene Break & Chapter Heading Illustrations — Import PNG/JPEG/SVG artwork
- Body Font — Choose from 30 built-in OFL fonts or import a custom TTF/OTF
- Book Title / Chapter Title / Part Title Fonts — Each slot has its own dropdown with built-in fonts, “Same as Body Font” default, or custom import
SEO & Description
- Book Description — Your blurb (useful when you upload to KDP, etc.)
- Keywords — Comma-separated keywords for discoverability
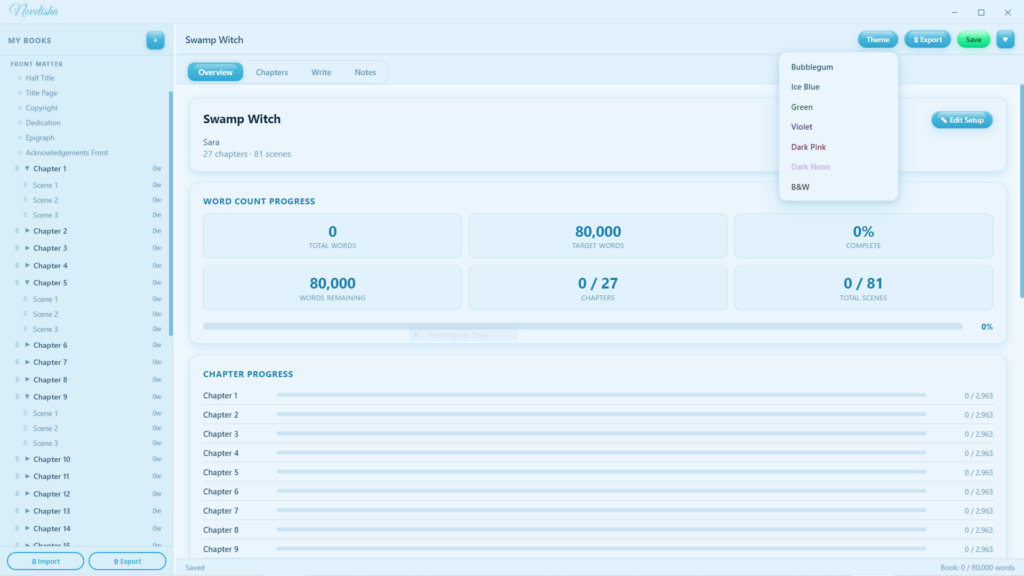
6. Overview Tab
The Overview tab gives you a dashboard view of your entire book at a glance:
- Total Words vs. Target Words with percentage complete
- Words Remaining to hit your goal
- Chapters written / total and Scenes written / total
- Progress bar showing visual completion
- Per-chapter progress bars showing how each chapter is doing vs. its target
- Book metadata — genre, series, ISBN, trim size, paper color, creation date
- SEO description
Click “Edit Setup” at any time to reopen the Book Setup Wizard and adjust your targets, metadata, front/back matter, or description.
7. Chapters Tab
The Chapters tab shows a detailed breakdown of every chapter and scene in your book:
- Each chapter shows its word count, target, and a progress bar
- Expand a chapter to see all its scenes with individual word counts and completion percentages
- Click any scene to open it in the Write tab
- Right-click chapters or scenes for rename/delete options
- Click “+ Chapter” to add a new chapter at the end
8. Writing
The Write tab is where the magic happens. It provides a WYSIWYG page-simulation editor for one scene at a time — what you see on screen closely matches how your text will appear in the final exported PDF. The editor displays your writing on a white page against a neutral desk background, with justified text, proper first-line indents, and your chosen font at book-like proportions.
Opening a Scene
Click any scene in the sidebar or Chapters tab. The Write tab opens automatically with that scene loaded.
Write Toolbar
- Chapter Title field — The editable chapter title at the top left. Type directly to rename the chapter — it saves automatically when you tab out or press Enter.
- Scene name — Shows the current scene name next to the chapter title (e.g., “Chapter 3 › Scene 2”). Rename scenes via right-click in the sidebar.
- Font selector — Choose from 30 professionally licensed OFL fonts grouped by category. Also sets the body font used in PDF, EPUB, and DOCX exports. (See Section 13.)
- Font size — 14px to 22px
- Word count — Live word count for the current scene vs. its target
Formatting Toolbar
Below the write toolbar is a full formatting toolbar with the following controls:
- ↩ / ↪ — Undo (Ctrl+Z) and Redo (Ctrl+Y) buttons
- B / I / U — Bold (Ctrl+B), Italic (Ctrl+I), Underline (Ctrl+U)
- H1 / H2 / H3 / P — Chapter Heading, Section Heading, Sub-heading, Normal Paragraph
- Align Left / Center / Justify — Text alignment controls
- “ — Block Quote (indented, italic text)
- *** — Insert a scene break divider
- —PB — Insert a page break (PDF export). To delete a page break or scene break, click on it to select it, then press Backspace or Delete.
- 📷 — Insert an image (JPEG or PNG)
Tip: All formatting is preserved in your exports. Bold, italic, headings, alignment, images, and scene breaks all export correctly to DOCX, PDF, and EPUB.
Inserting Images & Illustrations
Click the camera icon (📷) in the formatting toolbar to insert an image. Novelisha accepts JPEG and PNG files.
Image Guidelines for Publication:
- Format: JPEG (.jpg) or PNG (.png) only
- Color space: sRGB (standard for screens and most print)
- Resolution: 300 DPI minimum for print (KDP, IngramSpark)
- EPUB max: Images cannot exceed 5.6 million pixels (Apple Books requirement)
- No text in images: Apple Books rejects images containing embedded text
- Transparency: Use PNG for transparent images; JPEG for non-transparent (recommended)
- File size: Keep images under 10 MB each for best compatibility
Distraction-Free Mode
Click the ♥ heart button in the header or press F11 to enter distraction-free mode. This hides the sidebar, title bar, tabs, and status bar — leaving only the editor.
To exit, click the floating ♥ heart in the top-right corner, or press Esc or F11.
Undo & Redo
Use Ctrl+Z to undo and Ctrl+Y to redo. You can also click the ↩ and ↪ buttons in the formatting toolbar.
Writing Front & Back Matter
Front matter pages (e.g., Dedication, Epigraph) and back matter pages (e.g., About the Author, Also By) appear in the sidebar. Click any page to open it in the editor. Write your content just like a scene — it is included in all exports.
Find (Ctrl+F)
Press Ctrl+F (or go to Edit → Find) to open the Find bar. Type your search term to highlight all matches in the current scene. Use the ▲ and ▼ arrows (or Enter / Shift+Enter) to jump between matches. Press Esc or the ✕ button to close the Find bar.
Spell Check
Novelisha uses your operating system’s built-in spell checker. Misspelled words are underlined in red. Right-click for suggestions.
9. Notes Tab
Each book has its own Notes tab — a free-form scratchpad for anything you need to keep track of:
- Character profiles and descriptions
- Plot outlines and timelines
- Research and reference material
- Ideas for future scenes
- World-building details
Notes auto-save along with the rest of your book data.
10. Word Count System
Novelisha tracks word counts at every level of your book:
Live Counting
- Per scene: Updates live as you type in the Write tab
- Per chapter: Sum of all scenes in the chapter, visible in the sidebar and Chapters tab
- Per book: Sum of all chapters, visible in the Overview tab and status bar
Targets & Progress
- Book target: Set in the Book Setup Wizard (e.g., 80,000)
- Chapter target: Auto-calculated as book target ÷ number of chapters
- Scene target: Auto-calculated as chapter target ÷ scenes per chapter
- Progress bars and percentages update in real time throughout the app
Status Bar
The bottom status bar always shows:
- Save status: “Saved” or “Unsaved”
- Scene word count (when a scene is open)
- Total book word count vs. target
11. Exporting Your Book
Novelisha exports your book in three professional formats. Click the Export dropdown in the header bar to choose a format.
DOCX — Formatted Document
- Chapter titles formatted as Heading 1 — recognized by all layout software
- Table of Contents automatically generated — updates when you open the file in Word (right-click → Update Field)
- Scene breaks as *** on their own line — standard scene separator
- Body text with first-line indent, double-spaced
- Front matter sections (title page, copyright, dedication, etc.) before Chapter 1
- Prologue and Epilogue exported as regular chapters in the correct position
- Back matter sections (about the author, also by, etc.) after the final chapter
- Your selected body font name is used throughout (the font must be installed on the reader’s system to display correctly)
- Perfect for importing into professional formatting and layout tools
PDF — KDP Print
- Formatted for Amazon KDP print specifications
- Correct page size with bleed (6.125″ × 9.25″ for 6×9, or 5.626″ × 8.75″ for 5.5×8.5)
- Proper gutter margins based on page count (KDP requirements)
- Chapters start on right-hand (recto) pages (configurable)
- Embedded OFL fonts for legal publishing
- Table of Contents with correct page numbers
- Page numbering: Roman numerals (i, ii, iii…) for front matter and TOC; Arabic numerals (1, 2, 3…) starting at the first chapter (or Prologue, if included). Page numbers are suppressed on chapter-start pages per industry convention.
- Running headers: Author name on left pages, chapter title on right pages (suppressed on chapter-start and front matter pages)
PDF — IngramSpark
- Formatted for IngramSpark print specifications
- Minimum 0.5″ margins on all sides (IngramSpark requirement)
- All fonts embedded
- Same professional layout as KDP but with IngramSpark’s specific requirements
EPUB — eBook
- Standard EPUB3 format, compatible with all major platforms:
- KDP (Kindle), Draft2Digital, Apple Books, Barnes & Noble, Kobo, Scribd, and more
- Reflowable text (adapts to any screen size)
- Navigation table of contents (NCX + EPUB3 nav)
- Book metadata embedded (title, author, ISBN, description, keywords)
- Clean, semantic HTML with embedded stylesheet
- All selected fonts embedded via @font-face (body, title, chapter, and part fonts)
Copyright Page Note: The auto-generated copyright page includes [Publisher Name] as a placeholder. After exporting, open your file and replace this with your actual publishing imprint before submitting to any platform.
Important: Always review your exported files before submitting to any publisher. Open the DOCX in Word, the PDF in a PDF reader, and the EPUB in an EPUB reader (like Calibre) to verify formatting.
12. Themes
Novelisha includes 7 beautiful themes powered by the Cosmicore Jelly Glass design system. Click the Theme dropdown in the header bar to switch at any time.
Available Themes
- Bubblegum — Warm pinks and soft blush tones (default)
- Ice Blue — Cool blues and crisp whites
- Green — Fresh greens and natural tones
- Violet — Rich purples and soft lilacs
- Dark Pink — Deep rose and rich magenta tones
- Dark Neon — Dark mode with neon pink accents
- Black & White — Classic monochrome
Your theme choice is saved automatically and persists between sessions.
13. Fonts
All fonts in Novelisha are embedded locally and licensed under the SIL Open Font License (OFL). This means:
- They work offline — no internet connection needed
- They are 100% legal for commercial publishing
- They are properly embedded in PDF exports for print publishing
Novelisha includes 30 professionally licensed fonts grouped by category. You can select your body font in two places:
- Write tab toolbar — The font dropdown in the editor toolbar changes the body font instantly. This also sets the export body font.
- Book Setup Wizard → Custom Design — The Body Font dropdown (plus 3 additional slots for title, chapter, and part fonts). See Section 18 for details.
Both paths are synchronized — changing the font in one place updates it everywhere. The selected body font is embedded in all exports (PDF, EPUB, DOCX).
Literary / Novel (10 fonts)
- EB Garamond — Classic Old-Style serif, beloved by literary publishers. (Default)
- Crimson Text — Rich, warm serif inspired by old-style printing
- Cardo — Scholarly serif with broad language support
- Cormorant Garamond — Elegant, refined display serif for upmarket fiction
- IM Fell English — Historical, slightly irregular — perfect for gothic and period fiction
- Alegreya — Dynamic literary serif designed for long-form text, with a calligraphic feel
- Spectral — Google’s first serif designed for screen reading with excellent body text performance
- Vollkorn — Sturdy, quiet serif with a warm presence — great for novels and essays
- Libre Caslon Text — Revival of the classic Caslon, optimised for body text sizes
- Old Standard TT — Late 19th-century didone serif, ideal for classical and academic texts
Modern Serif (8 fonts)
- Lora — Contemporary serif with brushed curves
- Source Serif 4 — Clean, neutral serif designed for long-form digital reading
- Merriweather — Dense, sturdy serif optimised for screen readability
- Libre Baskerville — Classic Baskerville revival with open counters
- PT Serif — Transitional serif, excellent for body text
- Noto Serif — Google’s universal serif family with unmatched language coverage
- Tinos — Metrically compatible with Times New Roman — ideal for manuscript submissions
- Playfair Display — High-contrast display serif, beautiful for headings and upmarket fiction
Slab Serif (1 font)
- Bitter — Warm slab serif designed for comfortable screen reading
Sans-Serif (3 fonts)
- Open Sans — Clean, humanist sans-serif with excellent legibility at all sizes
- Lato — Semi-rounded sans-serif with a warm, professional feel
- Nunito — Rounded, friendly sans-serif perfect for middle grade and children’s books
Display / Titles (3 fonts)
- Cinzel — Roman-style all-caps serif, ideal for fantasy, epic, and classic titles
- Cinzel Decorative — Ornamental variant of Cinzel with decorative swashes
- Abril Fatface — Bold, high-contrast display face inspired by vintage advertising posters
Handwriting / Script (5 fonts)
- Great Vibes — Elegant formal calligraphy
- Dancing Script — Fluid, connected script — used for the Novelisha wordmark
- Caveat — Casual handwritten style, great for personal or journal-style writing
- Kalam — Natural handwriting feel with excellent readability
- Pacifico — Retro brush script, great for fun titles
Note: The selected font applies to your editor view and is embedded in all exported files. All 30 fonts are OFL-licensed and 100% legal for commercial publishing.
14. Data & Backups
Where Are My Books Stored?
All books are saved as JSON files in:
Documents/Novelisha/books/
Each book is a single .json file containing all chapters, scenes, notes, and metadata.
Auto-Save
Novelisha auto-saves your current book every 30 seconds while you’re writing. It also saves when you switch to another application or close the window.
Manual Save
Click the Save button or press Ctrl+S at any time.
Backing Up Your Books
You are responsible for backing up your own data. Cosmicore LLC is not responsible for any data loss. We strongly recommend:
- Regularly copy your Documents/Novelisha/ folder to a USB drive or cloud storage
- Use your operating system’s built-in backup features (Windows Backup, Time Machine, etc.)
- Export your book as DOCX periodically as an additional backup
Moving Books Between Computers
Copy the Documents/Novelisha/books/ folder from one computer to the same location on another. Your books will appear in Novelisha the next time you launch it.
Import & Export Book Files
Novelisha supports a portable .novelisha project format for sharing books between machines:
- Export Book: Click the ⇧ Export button at the bottom of the sidebar (or go to File → Export Book…) to save your book as a
.novelishafile that contains all your content, metadata, settings, and images. - Import Book: Click the ⇩ Import button at the bottom of the sidebar (or go to File → Import Book…) and select a
.novelishafile to load it into the app.
Tip: Use Export Book as an additional backup method alongside copying your books folder.
Updates
Updates may be released at Cosmicore LLC’s discretion. If an update is available, a new version will be uploaded to the Etsy listing. Check your Purchases & Reviews page on Etsy to re-download the latest version. Updates are always free for existing customers.
15. Keyboard Shortcuts
| Action | Shortcut |
|---|---|
| New Book | Ctrl+N |
| Save | Ctrl+S |
| Undo | Ctrl+Z |
| Redo | Ctrl+Y |
| Bold | Ctrl+B |
| Italic | Ctrl+I |
| Underline | Ctrl+U |
| Find | Ctrl+F |
| Distraction-Free Mode | F11 |
| Exit Distraction-Free / Close Modal | Esc |
| Zoom In | Ctrl+= |
| Zoom Out | Ctrl+- |
| Reset Zoom | Ctrl+0 |
| Export DOCX | Ctrl+Shift+D |
| Quit | Ctrl+Q |
On Mac, use Cmd instead of Ctrl.
16. Parts & Volumes
Group your chapters into Parts or Volumes (e.g., “Part One: The Journey”, “Volume II: Reckoning”). Each part gets a dedicated title page, and you can fully customize the part title page content and add optional sub-pages such as epigraphs, illustrations, or part-specific prologues.
Adding a Part from the Book Level
- Right-click your book in the sidebar
- Choose ♡ Add Part
- Type the part title (e.g., “Part One: The Calling”) and press Enter
Inserting a Part Before a Chapter
- Right-click any chapter in the sidebar
- Choose ♡ Insert Part Before…
- Type the part title and press Enter
Novelisha automatically assigns that chapter and all following unassigned chapters to the new part.
Editing the Part Title Page
Click the part header (♡) in the sidebar to open the part title page in the editor. You can add custom content below the auto-generated part number and title — for example, a subtitle, a quote, an illustration, or any text you like. If you leave the content empty, the default centered part title design is used in exports.
You can also right-click the part header and choose ✎ Edit Part Page.
Adding Part Sub-Pages
Right-click the part header in the sidebar to add optional pages that appear after the part title page and before the first chapter:
- ✦ Add Part Epigraph — Adds a dedicated epigraph page (one per part). Perfect for a quote, poem, or excerpt that sets the tone for the part.
- + Add Part Page — Adds a custom-named page. Use this for illustrations, short prologues, maps, author notes, or any content you want before the part’s chapters begin.
Sub-pages appear indented below the part header in the sidebar. Click any sub-page to open it in the editor and write or paste your content.
Renaming, Reordering & Deleting
- Right-click the part header to rename or delete the entire part. Deleting a part does not delete its chapters — they simply become unassigned.
- Right-click a part sub-page to rename or delete it.
Tip: Part headers appear as ♡ dividers in the sidebar above the first chapter of each part. Sub-pages appear as ◇ items directly below the part header.
In Exports
- PDF: A full-page Part title page (with your custom content, if any) is inserted before the first chapter of each part. Sub-pages each get their own page. Parts appear in the Table of Contents.
- EPUB: A dedicated Part title page (XHTML) with your custom content is inserted in the spine and TOC. Sub-pages are included as separate XHTML pages in the reading order.
- DOCX: Part titles are inserted as Heading 1 entries with a page break, followed by any custom content and sub-pages on their own pages.
Examples of Part Sub-Pages:
- Epigraph: A quote or poem that sets the mood for the part
- Illustration: A full-page image (map, drawing, or decorative art)
- Part Prologue: A short narrative introduction to the section
- Author Note: A brief message to the reader before the part begins
17. Chapter Design
Novelisha uses a single clean, professional chapter style for all exports (PDF and EPUB). This style is designed for industry compliance with KDP, IngramSpark, and all major self-publishing platforms.
Chapter Style
Every chapter in your exported book uses the following layout:
- Centered chapter title positioned 18% down the page
- Drop cap on the first paragraph of each chapter (the first letter is enlarged and dropped into the text)
- Scene breaks displayed as centered ornaments (“✦ ✦ ✦” or your custom image)
- Justified body text with first-line indent
Chapter Sub-Ornament
An optional decorative divider beneath the chapter title. It is off by default. To enable it, go to Book Setup Wizard → Print & Publishing and check Show decorative divider beneath chapter title. When enabled, the scene break ornament (or custom image, if set) is used as the sub-ornament.
Global Chapter Heading Illustration
Import a single illustration (PNG/JPEG/SVG) in Book Setup Wizard → Custom Design → Chapter Heading Illustration. This image appears above the chapter title on every chapter page.
Per-Chapter Illustration (Individual)
Each chapter can have its own unique illustration that overrides the global one:
- Right-click any chapter in the sidebar
- Choose 🎨 Chapter Illustration…
- Click Import Image to select a PNG/JPEG/SVG
The per-chapter image takes priority over the global chapter heading illustration for that chapter only. All other chapters use the global image (or none, if not set).
Chapter Title Display
Control how chapter headings appear in exported files. Set in Book Setup Wizard → Print & Publishing → Chapter Title Display.
- Title Only (default) — Shows the chapter title as you typed it (e.g. “The Beginning”)
- Number & Title — Shows “CHAPTER 1” above the title (e.g. “CHAPTER 1” + “The Beginning”)
- Number Only — Shows “Chapter 1”, “Chapter 2”, etc. (the title text is hidden)
- None — No heading text at all (chapter illustrations and content still appear)
Note: Prologue and Epilogue chapters always show their title regardless of this setting. Chapter numbering is sequential and excludes Prologue/Epilogue. The table of contents always uses the chapter title.
Chapter Start Side (Print)
Set in Book Setup Wizard → Print & Publishing:
- Right page (recto) — Industry standard. Chapters always start on an odd-numbered right-hand page. A blank page is inserted if needed.
- Either side — Saves pages and ink. Chapters can start on either page.
Running Headers
In Book Setup Wizard → Print & Publishing, set custom text for left (verso) and right (recto) running headers. If left blank, the default is:
- Left (verso): Author name
- Right (recto): Current chapter title
Running headers are suppressed on chapter-start pages, part title pages, and front matter.
18. Custom Design Imports
Found in Book Setup Wizard → Custom Design. Import your own artwork and fonts to make your book truly unique.
Scene Break Illustration
Replace the default “✦ ✦ ✦” scene break with your own artwork. The image also serves as the chapter sub-ornament beneath each chapter title.
- Accepts: PNG, JPEG, SVG
- Recommended size: 300–600px wide, transparent background
- Will be exported at small size (scene breaks) and medium size (chapter sub-ornament)
Chapter Heading Illustration
A global illustration that appears above the chapter title on every chapter page. Can be overridden per-chapter (see Section 17).
- Accepts: PNG, JPEG, SVG
- Recommended size: 800–1200px wide, 150–300px tall
Font Selectors (4 Slots)
Each font slot has a dropdown selector with all 30 built-in OFL fonts grouped by category, plus an option to import a custom TTF/OTF. All fonts are embedded directly in PDF and EPUB exports.
- Body Font — Used for all body text, paragraphs, and running headers. Default: EB Garamond. Choose any built-in font or import your own.
- Book Title Font — Used on the title page and half-title page. Default: Same as Body Font. Choose a built-in font, import a custom one, or keep “Same as Body Font”.
- Chapter Title Font — Used for chapter headings (h1). Default: Same as Body Font.
- Part Title Font — Used for part title pages. Default: Same as Body Font.
Each slot shows a live preview of the selected font below the dropdown. The title, chapter, and part slots include a “Same as Body Font” option that automatically follows whatever body font you choose.
Font Licensing: Only import fonts you have the right to embed in distributed files. OFL (Open Font License) and commercial licenses with embedding rights are acceptable. Do not embed fonts with “no embedding” restrictions.
Tip: Custom fonts work in all three export formats: PDF (fully embedded), EPUB (embedded via @font-face), and DOCX (font name referenced — the font must be installed on the reader’s system for DOCX).
19. Export Validation (Pre-Flight Checklist)
Before every export, Novelisha runs an automatic pre-flight validation to catch common publishing errors. A modal shows the results — you can fix issues before exporting, or proceed anyway.
Checks Performed
- Title & Author — Must be filled in for all formats
- ISBN — Required for IngramSpark PDF; recommended for EPUB
- Content — Warns if any chapters or scenes have no text
- Word count — Warns if the book is under 5,000 words (too short for most platforms)
- Image size — Warns if embedded images may exceed Apple Books’ 5.6MP limit
- Font embedding — Confirms all fonts are properly licensed OFL fonts
- File size — Estimates final file size for EPUB (Apple Books has a 2GB limit)
Validation Results
- ✅ Pass — Requirement met, no action needed
- ⚠️ Warning — Potential issue; review before submitting to publishers
- ❌ Fail — Critical issue that may cause rejection; fix before publishing
Tip: You can always click “Export Anyway” to proceed past warnings. Only fix the true failures (❌) before publishing.
20. eBook vs. Print Matter Toggles
Front matter and back matter pages can be set to appear in specific formats only. This is useful because some pages (like a “Also Available on Kindle” note) only make sense in print, while others may be eBook-only.
Setting the Toggle
In Book Setup Wizard → Front Matter / Back Matter, each item has a dropdown with four options:
- All — Included in all exports (PDF, DOCX, EPUB)
- eBook Only — Only included in EPUB exports
- Print Only — Only included in PDF and DOCX exports
- None — Excluded from all exports
Example: Set your “Also by…” page to “All” so it appears in both formats. Set a “Print Edition” note to “eBook Only” so it only appears in your EPUB.
21. Drag & Drop Reordering
Rearrange chapters and scenes directly in the sidebar without any menus.
Reordering Chapters
- Expand a book in the sidebar
- Grab the ⠿ handle on the left of any chapter row
- Drag it up or down to the desired position
- Release — the order is saved automatically
Reordering Scenes
- Expand a chapter to show its scenes
- Grab the ⠿ handle on any scene row
- Drag to reorder within the same chapter
Tip: Drag-and-drop reordering is immediate and auto-saved. Use Ctrl+Z in the Write tab to undo text edits, but chapter/scene reorders are permanent once dropped.
22. FAQ
Can I use Novelisha on multiple computers?
Yes. Your license allows you to install Novelisha on all personal devices you own. For the portable version, simply copy the .exe file.
Does Novelisha need the internet?
No. Novelisha works 100% offline. All fonts are embedded. Your data stays on your computer.
Can I publish books written in Novelisha?
Absolutely. All content you create is yours. All included fonts are OFL-licensed and legal for commercial publishing.
What’s the best workflow for getting to print?
Write in Novelisha → Export as DOCX → Import into your preferred formatting tool for final layout → Export final PDF/EPUB from there → Upload to KDP/IngramSpark/Draft2Digital. Alternatively, use Novelisha’s built-in PDF and EPUB export for direct publishing.
Can I import an existing manuscript?
Currently, Novelisha supports creating new books from scratch. Paste existing text into scenes manually.
Can I change my book structure after I start writing?
Yes. Right-click chapters or scenes to add, rename, or delete them at any time. You can also edit the book setup to change targets.
Where can I find my exported files?
When you export, a save dialog lets you choose exactly where to save the file. You can also access your books folder via File → Open Books Folder.
What if I need more fonts?
Novelisha includes 30 OFL-licensed fonts covering literary, modern, serif, slab, sans-serif, display, and handwriting styles — all free for commercial publishing. You can also import up to 4 custom fonts (body, book title, chapter title, part title) via Book Setup Wizard → Custom Design. See Sections 13 and 18 for details.
How do I move a book to another computer?
Click the ⇧ Export button at the bottom of the sidebar (or use File → Export Book…) to save a .novelisha file, then click ⇩ Import on the other machine. Or copy the Documents/Novelisha/books/ folder directly.
23. Support & Contact
Cosmicore LLC
Website: cosmicore.net
Email: hello@cosmicore.net
Support is provided on a best-effort basis. Please check this guide and the FAQ before reaching out. For bugs or feature requests, include your operating system and Novelisha version.
Thank you for choosing Novelisha. Happy writing!
© 2026 Cosmicore LLC. All rights reserved.
Novelisha is a product of Cosmicore LLC. The Cosmicore Jelly Glass design system is proprietary.